Ultimate Guide to the Singapore Class 3A Driving Practical Test: Ace with Confidence!
June 17, 2025 | by nearme.sg

Nervous? Here’s Your Step-by-Step Guide to Acing the Class 3A Practical Test
The day of your Practical Driving Test is nerve-wracking for everyone. You’ve spent weeks, maybe months, practicing, but now it all comes down to one 30-40 minute session with a tester. The key to passing isn’t just about being a good driver; it’s about being a test-smart driver.
The secret? Understanding exactly what the tester is grading you on. The Class 3A Driving Test Assessment Checklist is your rulebook. It’s not a secret document; it’s the blueprint for success.
This guide will break down the entire checklist, section by section, so you know exactly what to do (and what not to do) to pass with flying colours.
The Scoring System: How You Pass or Fail
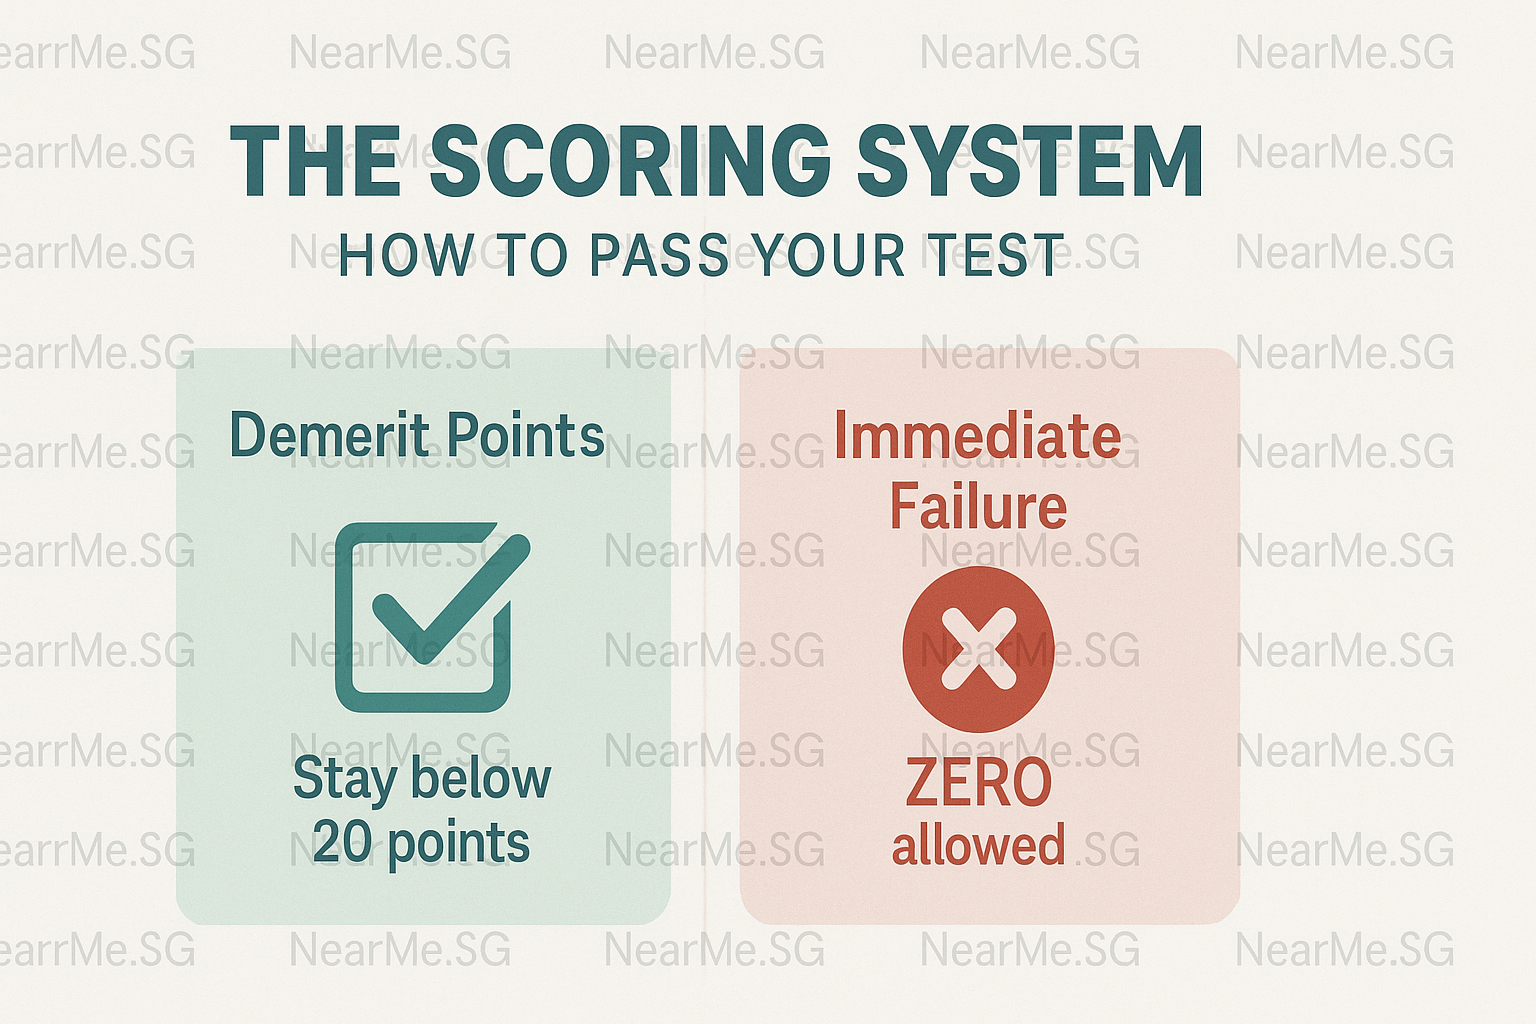
First, let’s understand the rules of the game. Your test result hinges on two things: Demerit Points and Immediate Failures.
- Passing Score: You need to accumulate fewer than 20 demerit points and commit zero Immediate Failures.
- Demerit Points (☑️): These are given for minor mistakes (e.g., failing to check a mirror, stalling). They range from 2 to 10 points. Accumulate 20 or more, and you fail.
- Immediate Failure (⦿): These are for serious errors that compromise safety. Committing just ONE of these will end your test immediately.
- No Demerit Point Warning (⮽): The checklist also has a box with a diagonal line. This is typically a warning for a minor fault that the tester has noted but decided not to penalize. Don’t rely on this, but know it exists.
Part 1: The Driving Circuit – Precision is Key
The first part of your test happens within the controlled environment of the driving centre circuit. This is where the tester assesses your fundamental car control skills.
Narrow Course (S-Course, Crank Course, Directional Change)
This tests your ability to manoeuvre the car in tight spaces.
- Strike Kerb (10 Points): A heavy penalty. This shows a lack of spatial awareness.
- Mount Kerb (Immediate Failure): The most common circuit failure. If your tyre goes onto the kerb, your test is over.
- Require Reverse Manoeuvre (2-4 Points): In the S-Course and Crank Course, you are expected to clear it in one go. Having to reverse to correct your path costs points.
- Fail to Confirm Safety (4 Points): Before moving, you must check your mirrors and blind spots. Always.
Pro-Tip: Control your speed with the brake pedal. Go as slow as possible to give yourself maximum time to steer. Remember your reference points taught by your instructor.
Parking (Parallel & Vertical)
A dreaded station for many, but very manageable with practice.
- Strike Kerb (10 Points): Just like the narrow course, hitting the kerb is a major error.
- Mount Kerb (Immediate Failure): An instant fail.
- Turn Steering Whilst Vehicle is Stationary (2 Points): This is a minor fault but easy to avoid. Always try to have the car crawling slightly when you turn the wheel. This is called “dry steering” and is discouraged.
- Exceed Stipulated Time (4 Points): You have 3 minutes for vertical parking and 5 minutes for parallel parking. Practice to get your timing right.
- Fail to Confirm Safety (4 Points): Checking mirrors and blind spots before reversing into the lot is mandatory.
Slope / Gradient
This tests your ability to control the car on a hill without rolling backwards.
- Roll Backwards (< 1 metre) (2 Points): A minor rollback is penalised.
- Roll Backwards (≥ 1 metre) (Immediate Failure): A significant rollback is considered dangerous.
- Unable to Move Off After 5 Attempts (Immediate Failure): Shows a lack of basic car control.
Pro-Tip: When moving off, pull the handbrake up firmly. Apply a little gas until you feel the car “bite” or want to move forward. Check your mirrors, then gently release the handbrake. The car should move forward smoothly.
Part 2: On The Road – Real-World Driving
Once you leave the circuit, the tester evaluates your ability to interact with traffic and road conditions safely.
Moving Off & Road Positioning
- Fail to Fasten Seat-Belt (2 Points): Do this before you even start the engine.
- Fail to Release Handbrake (2 Points): A common mistake when nervous. Make it part of your pre-drive checklist.
- Delay in Moving Off / Insufficient Acceleration (2 Points): You shouldn’t be a speed demon, but you also can’t be overly hesitant as it can obstruct traffic. Be confident.
- Fail to Keep Left (Road Hogging) (6 Points): On a multi-lane road, you should always be in the left-most lane unless overtaking.
- Fail to Keep a Safe Following Distance (6 Points): Always maintain the “two-second rule” between you and the car in front. The tester will be watching this closely.
- Change Lane at Bend (6 Points): This is dangerous. Always stay in your lane through a bend.
Junctions & Turning
- Incorrect Positioning (2 Points): Position your car correctly in the lane before a turn. Don’t be too far left or right.
- Improper Turning (Wide/Sharp/Incorrect Lane) (2-4 Points): Turn into the correct corresponding lane. A left turn should end in the left lane, and a right turn in the right lane (unless otherwise marked).
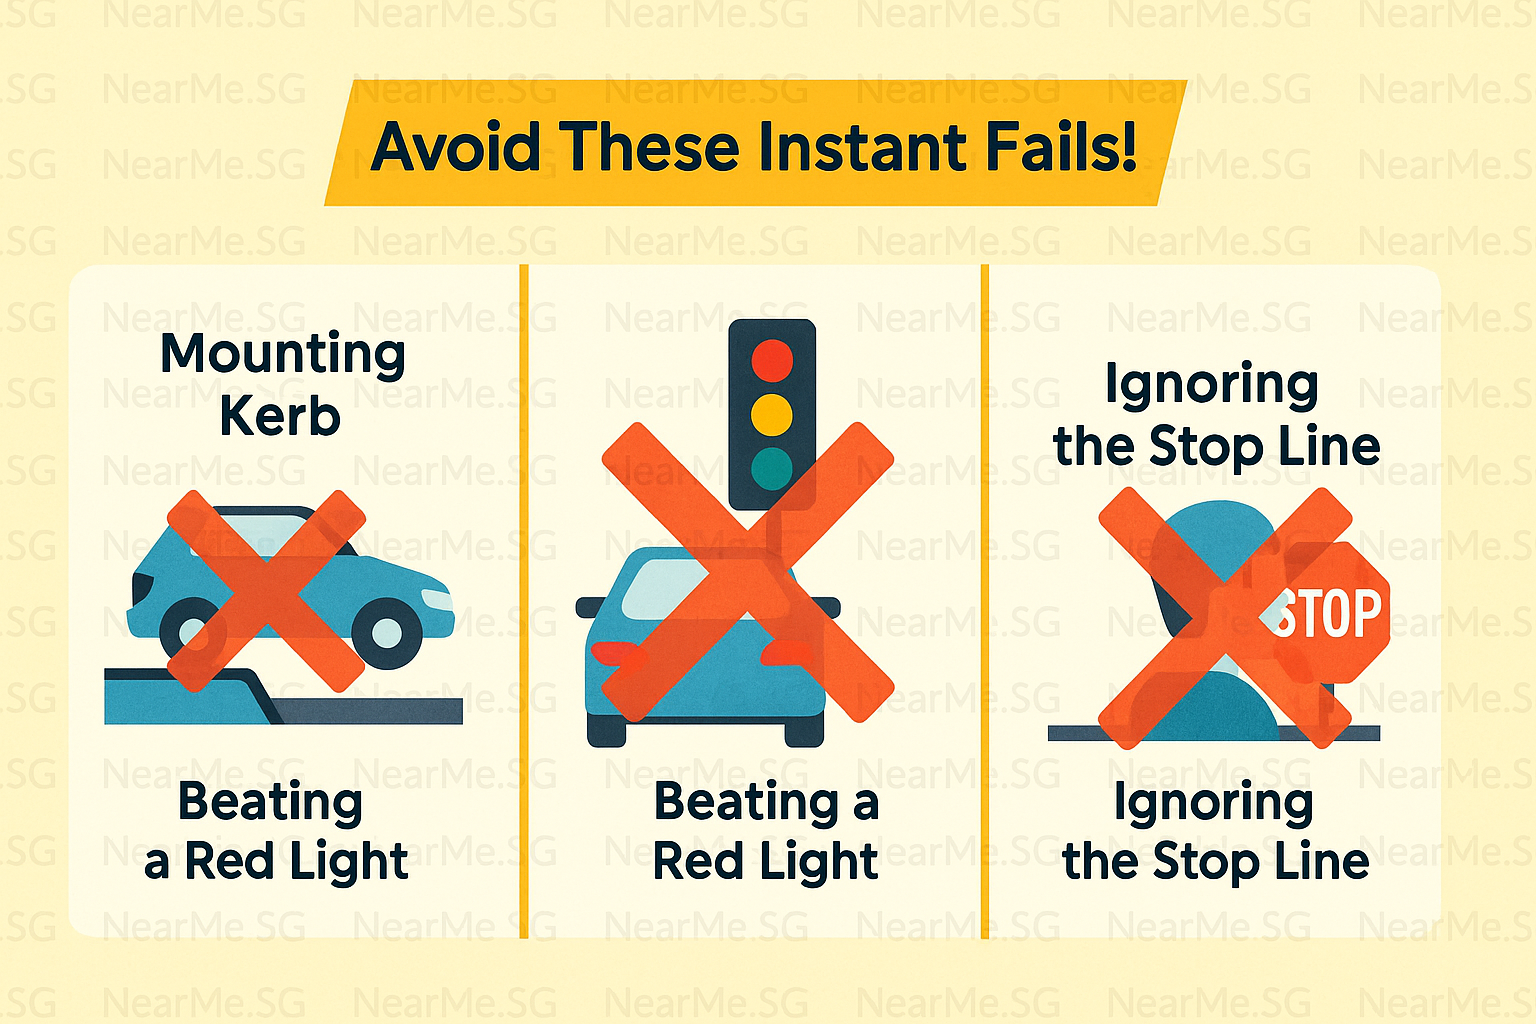
- Fail to Stop at Stop-Line (Immediate Failure): At a “STOP” sign, your wheels must come to a complete stop before the white line. A rolling stop is an instant fail.
- Remain in the Junction (Immediate Failure): Do not enter a yellow box or a junction unless your exit is clear. Getting stuck is an instant fail.
Traffic Rules & Speed
- Fail to Obey Traffic Signs/Lights (Immediate Failure): This is non-negotiable. Running a red light or ignoring a mandatory sign is an automatic fail.
- Exceed Speed Limit (Immediate Failure): Know the speed limits of the roads you are on and adhere to them strictly.
- Speed Too Slow (2 Points): Driving excessively slow can be a hazard. Drive at a speed appropriate for the road and traffic conditions.
Part 3: The Golden Rules – Safety Checks & Signals
These skills are assessed throughout the entire test, both in the circuit and on the road. They are the most common reasons people lose points.
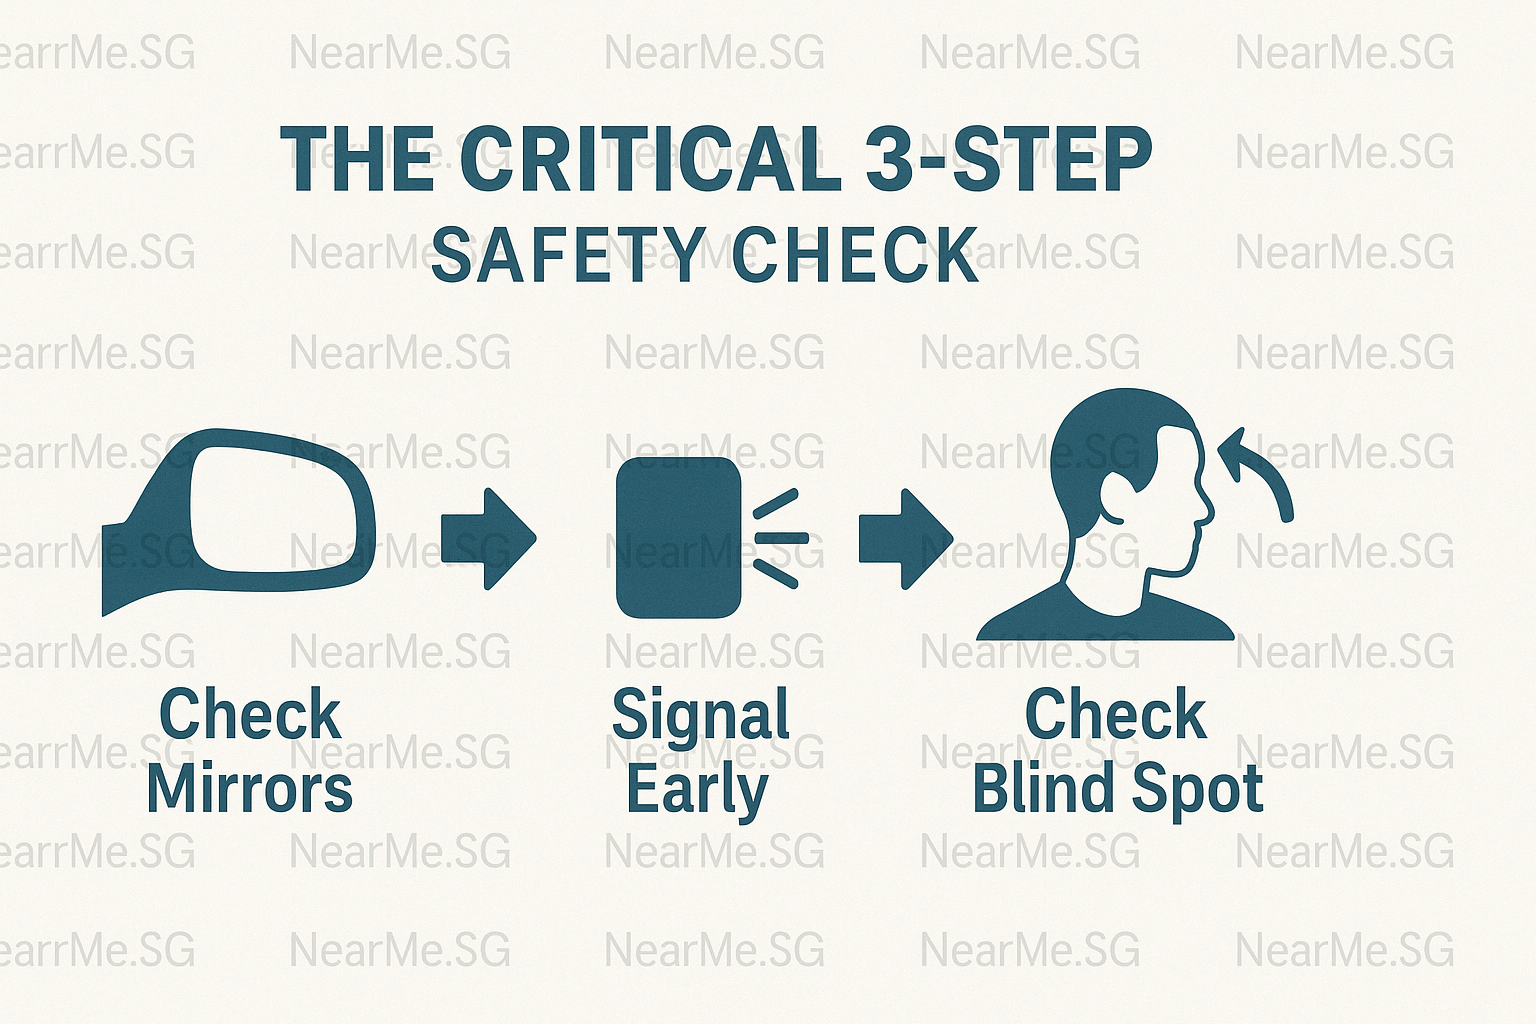
Safety Checks (The K.I.A.S.U. Method)
Be “Kiasu” (overly-cautious) with your safety checks. Testers need to see you do it. Exaggerate your head movements slightly if needed.
- Fail to Check Blind Spot / Mirror (2-4 Points): This is the #1 point-loser. Check your blind spots and mirrors BEFORE:
- Moving off from a stationary position
- Changing lanes
- Making a turn (left or right)
- Slowing down or stopping
- Reversing
- Incorrect Checking (2 Points): A quick glance isn’t enough. Make a deliberate head turn to cover the blind spot.
Driver’s Signals
- Fail to Signal in Good Time (2 Points): Signal early to give other road users plenty of warning.
- Fail to Signal / Give Wrong Signal (4 Points): Forgetting to signal is a serious communication error.
- Fail to Cancel Signal (2-4 Points): Don’t forget to cancel your signal after completing a turn or lane change.
The Unforgivable: A Summary of Immediate Failures
To pass, you must avoid these at all costs. Here is a quick-reference list of the most common Immediate Failures:
- Mounting the Kerb (Parking/Circuit)
- Rolling Backwards 1 Metre or More (Slope)
- Unable to Stop Within Stipulated Distance (E-Brake)
- Failing to Stop at a “STOP” Line
- Running a Red Light
- Exceeding the Speed Limit
- Failing to Give Way to Pedestrians at a Crossing
- Causing another Vehicle to Slow Down or Take Evasive Action
- Getting Stuck in a Yellow Box or Junction
- Driving Across a Centre Double White Line
Final Tips for Test Day Success
- Get a Good Night’s Sleep: A rested mind is a sharp mind.
- Arrive Early: Don’t add the stress of being late. Settle in and mentally review the test routes.
- Stay Calm and Breathe: If you make a small mistake (e.g., stall the engine), don’t panic. Take a breath, restart your procedure, and carry on. Panicking leads to more mistakes.
- Listen to the Tester’s Instructions: Pay close attention to their directions. If you are unsure, politely ask for clarification.
- Drive for Safety, Not for Speed: The goal is to be a safe, competent, and confident driver, not a fast one.
The driving test is a test of procedure and safety. By understanding this checklist, you are no longer guessing what the tester wants. You have the exact formula. Now, go practice with this knowledge, and you’ll be well on your way to getting that license!
Good luck, and drive safe!
RELATED POSTS
View all

10 Insane OpenClaw Use Cases 2026: Free Expert Guide
February 14, 2026 | by nearme.sg

Affordable landed homes under $3.5M? 2025 Guide
August 9, 2025 | by nearme.sg